Coding Notes
This page is reserved for coding notes, tips, and tricks that I have found useful in my coding journey. I will be adding to this page as I find new things to share, and will also include links to other resources that I have found helpful. This is a work in progress, so check back often for updates!
This is a summary of content loaded on this page:

- The Setting Up tab covers the initial steps for setting up your development environment using the most common tools such as Visual Studio Code, GIT, and Bash.
- The CSS/Bootstrap tab will cover tips and tricks for using CSS, Bootstrap, and other related web-design methods to create responsive and visually appealing web pages.
- The Python-Dev tab will cover tips and tricks for developing in Python, content in progress.
- Java/JS will cover tips and tricks for developing in Java and JavaScript, also content in progress.
Setting up a Development Environment
- Quick Links: VS Code Install
- GIT/Bit-Bash & NPM
- Setup/Baseline: Bootstrap CDNs/Font Awesome
- Checking in/out of GIT (Use of Tokens)
- Python Environment - Docker - PostGres/pgAdmin
- First, install Visual
Studio
Code found here (it's free & has a great set of extensions):
https://code.visualstudio.com/download
- To launch VS code from a command-prompt, CD to your working folder then type "code ." (dot means current folder).
- Be sure to integrate "live server" to preview pages into VS.code.
- Next, get GIT, found here (be sure to include Git Bash/Git GUI in the options and choose Visual Studio Code as the default editor): https://git-scm.com/downloads
- While VS.code uses GIT, it also has an "integrated terminal",
the shortcut of which is Ctrl-` (back-tick ` is under tilda~),
and requires the following VS-code environment setup:
- Once "integrated terminal" is open in VS.code interface
- Find the "+" button in that window (next to powershell if using this for the first time), and click on the "V" drop-down toggle next to it..
- Select menu "Select Default Profile" (which opens up..)
- Select "Git Bash"
- You may need to select your "powershell" icon and "kill" the terminal session before being able to use bash.
- Next, configure your GIT environment by following the instructions here: https://git-scm.com/book/en/v2/Customizing-Git-Git-Configuration
- Read more on [GIT] Bash here: https://www.gnu.org/software/bash/ or https://www.atlassian.com/git/tutorials/git-bash
- Here is a list common Bash commands used with
(and not necessarily exclusive to) GIT:
   cd ~    //change to home directory (/c/Users/patri)
   pwd     //shows present working directory
   cd ~/OneDrive/nucamp   //gets you do nucamp root directory
   ls      //lists all files, use "ls -a" to show all/hidden
   touch filename  //creates a filename (include extension!)
   touch .filename //creates a hidden filename in local directory
   history //shows a list of all recent bash commands used
   exit    //closes bash cli (command line interface)

INSTALLING NODE/NPM VIA NVM (Node Version Manager):
===================================================
- Go to https://github.com/coreybutler/nvm-windows/releases
- Scroll down to "Assets" and click on nvm-setup.exe (or unzip zip)
- Accept all defaults, then restart VS-code to see it in terminal
- Note that it will auto-update NVM in the background via settings.
- For specific code, my projects use the following versions:
* Node Version 18.20.5 and NPM version 10.8.2
- Verify version of node via command: node -v
- Installed via commands: \-> married to 18.20.5:
nvm install 18.20.5
npm list(if u have multiple)
nvm use 10.20.5
npm -v(verify as 10.20.5)
nvm --version-->(1.2.2 in Mar 2026)
- To get this to work with your project, you need the following steps to get npm to run parcel (read more here), prepped as follows.
- In the VS-code terminal window, in the root if your site (where
the package.json file would go), run these commands (the first
command will create a blank package.json file for you):
npm init -y
REM: this updates your npm startup to run parcel, etc.
npm install --save-dev parcel
npm install bootstrap@5.2.3
npm install @fortawesome/fontawesome-free@6.2.1
- Modify your package.json startup page to index.html with the
following (replacing description/main/scripts fields):
"description": "A portfolio website.", "source": "index.html", "scripts": { "start": "parcel --open", "build": "parcel build" }, - When all of the above is set up, here are some
VERY IMPORTANT last steps to get your project
running with the new npm/parcel setup:
- In VS-code terminal in root folder
(where package.json file is), run:
npm start
- On the first launch, a bunch of files are compiled, downloaded, updated (takes 3-5 minutes+), opens a browser, but after all downloads complete, refresh your browser to the compiled index.html and its includes.
- Hit Ctrl-C to stop the npm-start session.
- Create a local .gitignore file so when you check
these into GitHub it prevents unnecessary uploads
(as they are re-downloaded on npm start)--
.gitignore should sit next to package.json
and has no file-extension.
    node_modules
    dist
    .parcel-cache
    .firebase
- In VS-code terminal in root folder
(where package.json file is), run:
- Lastly, for future reference update your links to use the local node_modules installed (which will take you off of the CDN links):
 <!-- Bootstrap CSS -->
 <link rel="stylesheet"
  href="node_modules/bootstrap/dist/css/bootstrap.min.css"/>

 <link rel="stylesheet"
  href="/node_modules/@fortawesome/fontawesome-free/css/fontawesome.css"/>
 <link rel="stylesheet"
  href="/node_modules/@fortawesome/fontawesome-free/css/brands.css"/>
 <link rel="stylesheet"
  href="/node_modules/@fortawesome/fontawesome-free/css/solid.css"/>

 <!-- Bootstrap JavaScript plugins (at bottom of page) -->
 <script src="node_modules/bootstrap/dist/js/bootstrap.bundle.js">
 </script>

REFERENCES: Why Package.json? NPM Basics
 - https://medium.com/@shgautam/why-package-json-npm-basics-cab3e8cd150
A Complete Beginner's Guide to NPM
 - https://css-tricks.com/a-complete-beginners-guide-to-npm/
Installing Font Awesome
 - https://fontawesome.com/docs/web/setup/packages

CODING GAMES:
=============
Learn Git Branching- Game that teaches you to work with Git Branching.
 -> https://learngitbranching.js.org/?locale=us
CSS Diner- A game where you use CSS Selectors to target the directed diner items!
 -> https://flukeout.github.io/#

ADDITIONAL RESOURCES:
====================
Git & GitHub Workflow for Beginners (created by Nucamp)
 ->https://www.codingmadeclear.com/git-github-workflow-for-beginners/

GitHub Cheat Sheet (created by Nucamp instructor Natalie Childs)
 ->https://www.codingmadeclear.com/git-github-cheat-sheet-for-beginners/

GitHub Gist (created by Nucamp instructor Kevin Gay)
 ->https://gist.github.com/KevoCodo/d3c44a8c9475df44d23b5350058c83d3

Git Brownbag Gist (created by Nucamp instructor Michael Whitt)
 ->https://gist.github.com/MichaelWhitt/3b3eed17017933cfaf52f285af914432

Code Analogies: The Basics of Git Explained by Designing a New Car
 ->https://pixelpioneers.co/blog/2017/git-basics-explained-by-designing-a-new-car

Official Git Cheat Sheet
 ->https://training.github.com/downloads/github-git-cheat-sheet/

Atlassian Git Cheat Sheet
 ->https://www.atlassian.com/git/tutorials/atlassian-git-cheatsheet

Git tutorial and exercises on W3 Schools
 ->https://www.w3schools.com/git/default.asp

 Deploying a static site to GitHub Pages via Netlify:
  - https://www.netlify.com/blog/2020/04/06/a-step-by-step-guide-deploying-a-static-site-to-github-pages-via-netlify/
  - Also see attached PDF on Netlify deployment
Checking in/out of GIT
Best practice to attaching VS.code to a GIT-HUB account repository is through use of a token assigned to you by the https://github.com site, steps of which are listed below:- First sign into the web-site using your known e-mail account: https://github.com
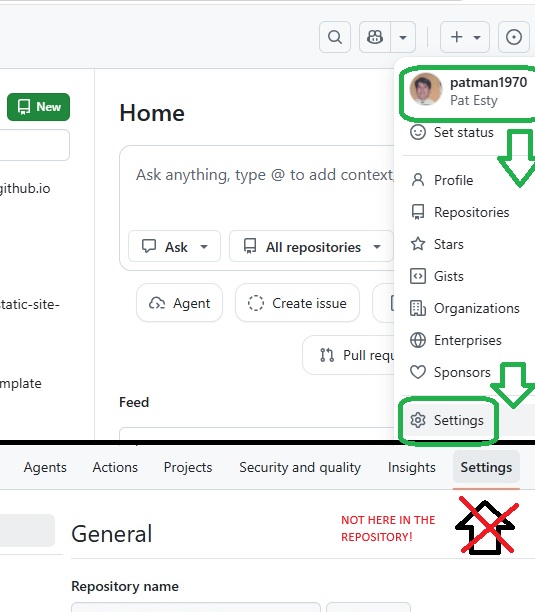
- If you already have a personal access token, you can use it.
Otherwise, in GitHub, from the "Home" screen access the "Settings"
menu from your profile-picture (not when in a repository) as shown:
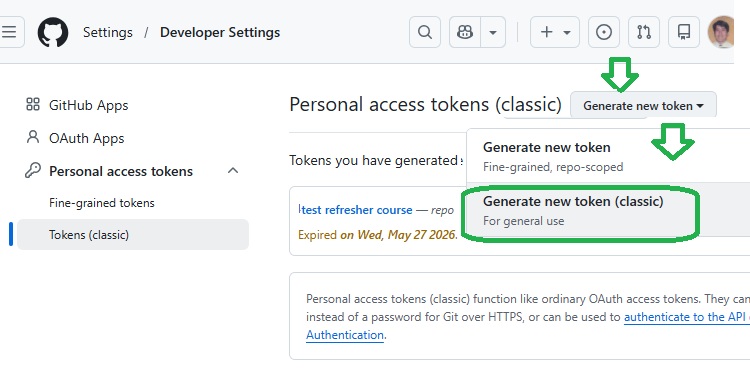
- Once in the "Settings" menu, you have to select the left menu item called "Developer Settings" (not shown).
- Once in "Developer Settings", click on the "Tokens (classic)"
to begin the token refresh process on this next screen -- you then
need to click on the upper-right button labeled "Generate new token"
as shown below:
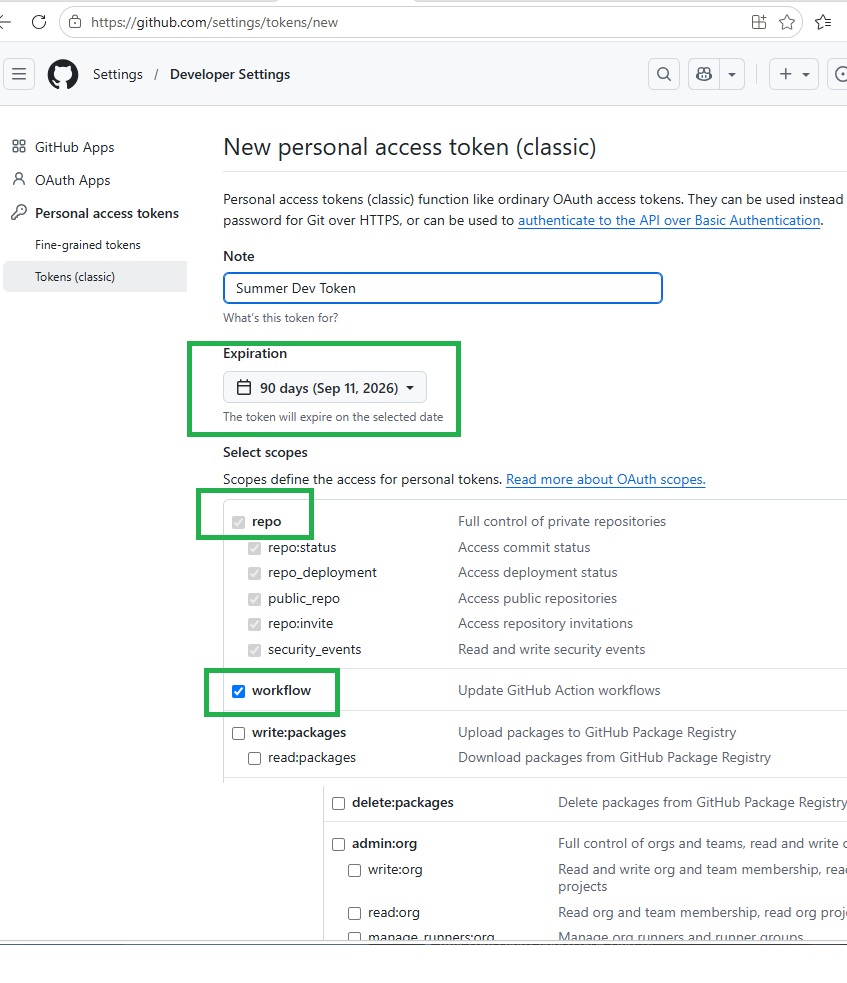
- Lastly, be sure to select your token time-length (90 days shown below),
the "repo" checkbox to control your repository, and "workflow" as shown,
the scroll to the bottom (not shown) to generate the token with a button --
the new token will show up on the next screen (also not shown):
- To apply this to your VS-code setup, you first have to init your GIT repository locally OR pull in your repository if it's already in https://github.com through the following commands below -- afterward, it should prompt you for a token in the VS-code interface (if not, you have to Google how to do the next steps because it keeps changing!):
echo "# This is a sample READ.md" file" >> README.md
git init
git add README.md
git commit -m "first commit"
git branch -M main
git remote add origin https://github.com/patman1970/patman1970.github.io
git push -u original main

#NOTE: you can use thnis instead to clone a copy of the repository
#do your location workstation:
git clone https://github.com/patman1970/patman1970.github.io
Other helpful GIT commands
git config --global credential.helper cache
git add src/myfile.txt
git commit -m "push changes to main"
git push -u origin main
# This will create a .gitignore file to prevent GIT
# checkints to this particular folder:
echo app/helloapp/migrations >> .gitignore
echo venv >> .gitignore
Python Setup in VS-Code
- From image above, go here (and make sure to check box
"add Python to PATH" during installation):
https://www.python.org/downloads/
- After install, verify w/bash cmd: python --version
or w/capital "V":
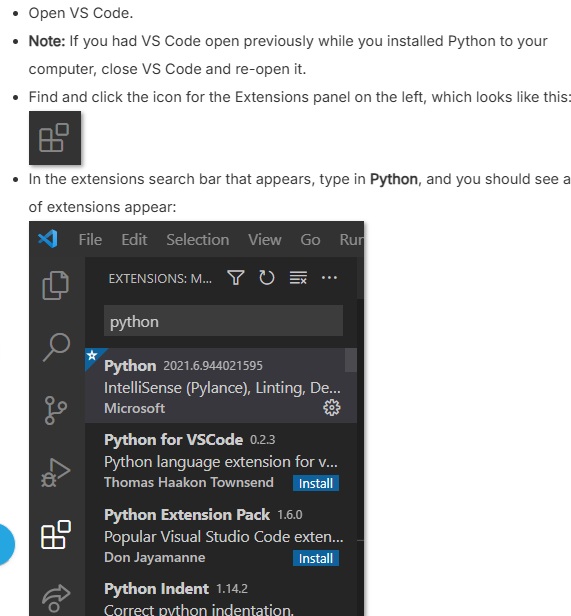
python -V - Install the VS Code extension (image, right), and when done you have to restart the VS code program.
- Install pip (packages for python): PIP via. command:
python -m pip install --upgrade pip - Install pylink (linting pre-empts errors with
warning messages) via command:
pip install pylint
(OR:python -pip install pylint) - Install PEP 8 (code formatter for python) via
these TWO commands:
pip install pep8pip install --upgrade autopep8 - In VS Code, go to File > Preferences > Settings
then find "paper icon" which creates a settings.json
file, and some of the following lines to the file if not
already there -- to a file that looks like this:
{ "terminal.integrated.profiles.windows": "Git Bash", "editor.formatOnSave": true, "python.linting.enabled": true, "python.linting.pylintEnabled": true, "python.linting.pylintArgs": ["--errors-only"], "liveServer.settings.donotShowInfoMsg": true, "git.autofetch": true } - Save the settings.json you just created and close it.
- After install, verify w/bash cmd: python --version
or w/capital "V":
Docker Setup
- Go to
https://hub.docker.com/editions/community/docker-ce-desktop-windows/
to download the latest version of Docker Desktop for Windows.
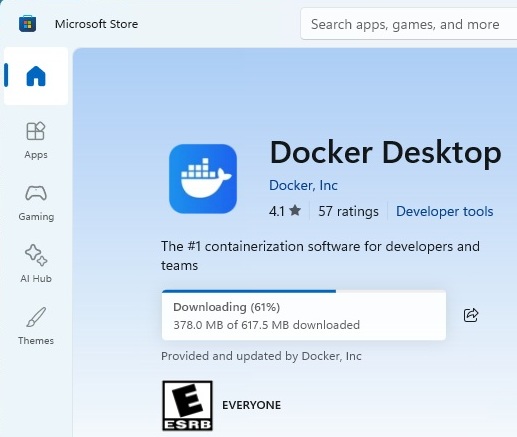
Docker setup in MS Store
- To verify in VS-Code run this command (after reboot):
docker --version - A typical run of projects looks like this after
applying a configuration file (discussed later):
docker run --rm hello-world - Once you have a "docker-compose.yml" set up in your local
directory (and docker desktop started up before hand),
this command starts to compose or 'compose a symphony'
by bringing 'up' a virtual conainer -- the "-d" means to
detach the memory into a separate container or as background
process:
docker compose up -d - Use this command to 'list' processes managed by docker,
which should show information if the 'compose up' works:
docker compose ls
NAME      STATUS      CONFIG FILES
nupgsql   running(3)  C:\Users\patri\..\docker-compose.yml
- You can use this to execute threads in the container,
which returns a number of records in the pg_database started:
docker exec pg_container psql -c 'SELECT COUNT(*) FROM pg_database' - The pg_container is actually the name of the process
which is found by running this command to get details of
the main composer thread:
:
docker compose ps
NAME              IMAGE                     COMMAND     ..
flask_container   nupgsql/flask:latest      "tail -f /de..
pg_container      postgres:14.1-alpine3.15  "docker-entr..
pgadmin_container dpage/pgadmin4:6.4        "/entrypoint..
- Use this to shut down the composer thread:
docker compose stop - The 'stop' command just suspends the thread, so you
have the option to resume it with this command:
docker compose start - Use this to stop and erase all memory:
docker compose down
PostGres Admin (pgAdmin) Startup
- After making sure docker is running in the above steps,
start the pgAdmin (postGres) command-line interface (CLI) by
typing in the following command from a vs-code terminal:
docker exec -it pg_container psql - If you want to start it with a default user, use -U like so:
docker exec -it pg_container psql -U postgres - Some windows user may have to access it this way:
winpty docker exec -it pg_container psql - Common CLI commmands for pgAdmin
\? - help (space key to forward, 'q' to exit)
\l - list all databases in current container
\c XYZ - connect to database XYZ listed in \l
\dt - list data tables in current DB connection
\q - quit CLI session
Access pgAdmin
- To access pgAdmin, a web browser such as Chrome or Firefox, and type this local address into the address bar:
- You should now see a pgAdmin interface in your browser.
- Click the Add New Server button.
- In the General tab, enter (anyname) as the Name
- In the Connection tab, enter pg as the Host name/address
- Save the settings.
- In the left tree view, expand the view for Servers
- See image below on the relationship of the "pg" server, the 5433 web-port as found in the docker-compose.yml file shown:

- PostGres SQL uses pretty standard ANSI SQL syntax, so no need to
show everything, but the advanced stuff (also ANSI) is an interesting
read at
https://www.postgresql.org/docs/current/queries-with.html
Sample TSQL (Transactiom-SQL):SELECT customer_id, SUM(freight) as TotFreightAmt FROM orders GROUP BY customer_id HAVING SUM(freight) > 500.00 ORDER BY TotFreightAmt LIMIT 5;
Cascading Style Sheets (CSS) and Bootstrap Tips & Tricks
This is a dump of my notes with some quick links:
- CSS backgrounds/images === Using display block/inline
- CSS specificity/combinators ==> See attachment on advanced selectors
- Bootstrap ==== Bullet Styles ==== Text/BG Colors
- Bootstrap Flex ==== w/Images ==== w/NavBars
- Font Awesome
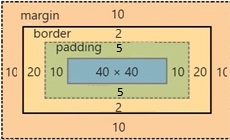
Each element takes up space in this level of layers:
 +----------------+ Example:
 |     margin     |  div { //clockwise from top
 | /-- border --\ |     padding: 5px 10px;
 | | +--------+ | |   // if 1 value, do all sides,
 | | |padding | | |   // if 2 values, 5px = top+bot
 | | | /----\ | | |   //     and 10px is left+right
 | | | |text| | | |
 | | | \====/ | | |     border: solid black 2px; }
 | | +--------+ | |   // border-style is REQUIRED
 | \==(border)==/ |   // others are optional, plus
 |  <= margin =>  |   // order of 5px/blue doesn't
 +----------------+   // matter.
|
|
You can put comments in stylesheets, but can only
be presented inside of /* .... */ (not <!-- -->)

background: lightgreen url("pic.jpg") center/100px repeat-x;
-> is shorthand for div { background-color: green;
    background-image: url("pic.jpg");
    background-position: center;
    background-size: 100px;
    background-repeat: repeat-x; }
-> Important to note that center/100px is REQUIRED
   in that format when position & size are together.

font: italic 18px bold Cambria, Georgia, serif;
-> is shorthand for div { font-style: italic;
    font-size: 18px; font-weight: bold;
    font-family: Cambria, Georgia, serif; }
-> and you can only use the font shorthand when
   these two properties are present: size & family
   where family-list must always be placed LAST.


display: block;  - element acts like a div/block
display: inline; - element stays on same line
                   (and ignores height/width props)
display: inline-block; can stay on same line and
         be given height & width properties.
display: none;  - hides the element


/*****************************************************************************/
/*** CSS Specificity & Combinators ******************************************/
Selector	Example	Description		Weight
==============  ==============================  ===========================
Inline styles	<h1 style="color: pink;">	- Highest priority, overrides
Id selectors	#navbar	  			- Second highest 1-0-0
Classes, attribute selectors and pseudo-classes	- Third highest  0-1-0
               .test, [type="text"], :hover
Elements/pseudo-elements, e.g. h1, ::before, ::after - Low 0-0-1
Universal selector and :where()	*, where()	No priority	0-0-0

 /*** ==> See attachment on advanced selectors

/******* COMBINATORS in CSS STYLESHEETS ***************************/
Also: https://www.w3schools.com/cssref/css_ref_combinators.php
/****************************************************************/
Descendant: selects ALL <p> elements inside <div> elements:
  div p {
    background-color: yellow;
  }
Direct Child (>) selects lvl-1 <p> elements inside <div> elements,
  div > p {      but must be CHILD in the div, not a grand-child:
    background-color: yellow;
  }
Next sibling combinator is used to select an element that is
directly AFTER a specific element (and no other bro/sisters):
  div + p {
    background-color: yellow;
  }
Subsequent-sibling combinator selects all elements that are next
siblings (ALL brothers/sisters) of a specified element.
  div ~ p {
    background-color: yellow;
  }

===============================================================/
BOOTSTRAP NOTES ==============================================/
=============================================================/
A) Put this in the <head> section to define CSS shortcuts
   and a viewport that says "adapt to actual screen hw":

  <meta name="viewport" content="width=device-width, initial-scale=1">
  <link href="https://cdn.jsdelivr.net/npm/bootstrap@5.2.3/dist/css/bootstrap.min.css"
         rel="stylesheet" integrity="sha384-rbsA2VBKQhggwzxH7pPCaAqO46MgnOM80zW1RWuH61DGLwZJEdK2Kadq2F9CUG65"
         crossorigin="anonymous">

B) Put this before </body> to fine the library (and making
   sure any vars declared earlier do not override bootstrap):

  <script src="https://cdn.jsdelivr.net/npm/bootstrap@5.2.3/dist/js/bootstrap.bundle.min.js"
    integrity="sha384-kenU1KFdBIe4zVF0s0G1M5b4hcpxyD9F7jL+jjXkk+Q2h455rYXK/7HAuoJl+0I4"
    crossorigin="anonymous"></script>

C) Don't forget to INIT your GitHub with commands:
   git init
   git add .
   git commit -m "Set up the home page"

============================================================/
BOOTSTRAP ROW/COL SPACING "DIMENSION" INSTRUCTIONS ========/
==========================================================/
D1) All containers must have the class="container"
    (and do not need to be a div)
D2) All containers must have at least one class="row"
    and one class="col" -- all content displayed must be
    in the class="col" area tags, like so:

    <main class="container">
      <section class="row">
        <div class="col-sm-4 col-md-3">
          <h2>Discover & Review</h2>
        </div>
        ...
      </section>

  - The "sm" and "md" designators are "class inflix" settings, meaning:
    a) listen to "sm" designators if the screen is >= 576px or "xs"< 576px
    b) listen to "md" designators if the screen is >= 768px, "lg" >= 992ox
    c) listen to "xl" if screen >= 1200px and "xxl" means use if >= 1400px

  - So, "col-sm-4" means if < 576px screen (very small) use one column
    but if >= 576px then this column spans 4 columns
  - And, "col-md-3" means if screen >= 768px, this col spans 3 columns only
  - If you were on an 800px screen, "Discover & Review" will be colspan=3
    with 9 remaining columns used to display any other div's that follow.

D3) If you want your "col" container to be the first (but it is placed
    in the middle, you can force it with class="order-sm-1"/"order-sm-first"
  - Similarly, you can force it to be last via class="order-sm-last".
  - If you want to force it to be 2nd, use class="order-sm-2", etc.

D4) You can offset a few columns (making previous column blank) via:
    class=".. offset-1" - meaning to shift it 1 cell over to the right.


=========================================================/
BOOTSTRAP "EXTRA FORMATTING" INSTRUCTIONS ==============/
=======================================================/
E1) You can remove bullets to unordered-lists via class="list-unstyled"
    e.g. <ul class="list-unstyled">

E2) Colors use special classes with text-prefixes,
    and back-ground "bg" prefixes listed here:

      https://getbootstrap.com/docs/5.2/utilities/colors/
       <p class="text-warning bg-dark">.text-warning</p>
        - red font, dark back

    and spacing:
      https://getbootstrap.com/docs/5.2/utilities/spacing/


=====================================================/
BOOTSTRAP AND "FLEX FORMATTING" INSTRUCTIONS =======/
===================================================/
F1) Bootstrap implements or merges "flexbox" features as defined here:

    https://getbootstrap.com/docs/5.2/utilities/flex/#align-items

   - Example (where d refers to "direct children elements"):
    <div class="d-flex p-2">I'm a flexbox container!</div>
    <div class="d-inline-flex p-2">I'm an inline flexbox container!</div>
   - This merges with RESPONSIVE sm/lg/xl/xxl VIA d-sm-flex/d-lg-flex/etc.

   - While "flex-row" can be omitted since it is a 'left to right' default,
     you can indicate your row to go in reverse with this class/utility:

    <div class="d-flex flex-row-reverse"><!-- must have d-flex or variant-->
      <div class="p-2">item 1</div><div class="p-2">item 2</div>
      <div class="p-2">item 3</div><!-- prints as "item 3|item 2|item 1" -->
    </div>

    - While "flex-column" can be omitted since it is a 'top to bot' default,
     you can indicate your row to go in reverse with this class/utility:

    <div class="d-flex flex-column-reverse"><!-- must have d-flex or variant-->
      <div class="p-2">item 1</div><div class="p-2">item 2</div>
      <div class="p-2">item 3</div><!-- prints as "item 3|item 2|item 1" -->
    </div>

    - Row/Cols can be responsive: flex-sm-row-reverse/flex-sm-column-reverse

F2) You can JUSTIFY a row with either, with "justify-content-start" as default:
           ==============
     <div class="d-flex justify-content-start"  >X/Y/Z....</div>
     <div class="d-flex justify-content-end"    >....X/Y/Z</div>
     <div class="d-flex justify-content-center" >..X/Y/Z..</div>
     <div class="d-flex justify-content-between">X../Y/..Z</div>
     <div class="d-flex justify-content-around" >.X./Y/./Z.</div>(tight ends)
     <div class="d-flex justify-content-evenly" >..X.Y/.Z..</div>(? precise)

    - Rows can be responsive: justify-content-sm-start/etc.

    - Use the "flex-fill" class on a series of sibling elements to force them
      into widths equal to their content, taking up all available horizontal space.
      <div class="d-flex">  <!-- presents like X ...... /Y .. /Z -->
        <div class="p-2 flex-fill">item with a lot of content</div>
        <div class="p-2 flex-fill">item 2</div>
        <div class="p-2 flex-fill">item 3</div>
      </div>  <!-- is also responsive, e.g. "flex-lg-fill" -->

     - Another option is "flex-grow-1" where 1 means fill in all extra space:
      <div class="d-flex">  <!-- presents like X ...... /Y .. /Z -->
        <div class="p-2 flex-grow-1">item small</div>
        <div class="p-2 flex-fill">item 2</div>
        <div class="p-2 flex-fill">item 3</div>
      </div>  <!-- is also responsive, e.g. "flex-lg-grow-1" -->

     - Another option is to shrink the last cells if a previous as a "w":
       <div class="d-flex">  <!-- presents like X .......... /Y -->
         <div class="p-2 w-100">Flex item</div>
         <div class="p-2 flex-shrink-1">Flex item</div>
      </div>  <!-- is also responsive, e.g. "flex-lg-shrink-1" -->

     - You can also align-text inside their boxes like so:
        <p class="text-start">Start aligned text on all viewport sizes.</p>
        <p class="text-center">Center aligned text on all viewport sizes.</p>
        <p class="text-end">End aligned text on all viewport sizes.</p>
        <!-- is also responsive, e.g. "text-lg-start" -->
     - More found here: https://getbootstrap.com/docs/5.2/utilities/text/

F3) Use align-items utilities on flexbox containers to change the HORIZONTAL
    with "align-items-stretch" as the default (start with "d-flex is optional):
     <div class="d-flex align-items-start">...</div>
     <div class="d-flex align-items-end">...</div>
     <div class="d-flex align-items-center">...</div>
     <div class="d-flex align-items-baseline">...</div>
     <div class="d-flex align-items-stretch">...</div> (default, take entire!)

    - Rows can be responsive: align-items-sm-stretch

    - A specific cell in a group can do a ONE-OFF via "align-self-XXX":
       <div class="align-self-start">item</div> <!-- does NOT need "d-flex" -->
       also: align-self-end/center/baseline/stretch, and + responsive, example:

       <div class="d-flex align-items-start"><!-- START OF ROW -->
          <div>I take the default of the row (align top)</div>
          <div class="align-self-sm-center">Self-aligned sm flex item</div>
          <div>I take the default of the row (align top)</div>
       </div>

F4) In Bootstrap, spacing utility classes follow the pattern:
	{property}{sides}-{breakpoint?}-{size}
    Where:
	property: m for margin, p for padding
	sides: t (top), b (bottom), l (left), r (right), x (left & right),
		y (top & bottom), or no letter (all sides)
	size: 0 to 5 (or auto)
    Example:
	<div class="ml-0">Your content</div>


===============================================/
BOOTSTRAP IMAGES AND AUTO-WRAPPING  ==========/
=============================================/
 - Bootstrap has "img-fluid" that would make it responsive to the page:
     <img src="img/logo.png" class="img-fluid" />
 - This class REPLACES the need to do this in your file-header using CSS:
     <style> img { max-width: 100%; height: auto; } </style>
 - Basically, both class="img-fluid" and the CSS makes it fit the viewport.
 - To make an image disappear on smaller screens, use "d-none d-sm-block"
   to hide it on xs, but show it on sm and up, e.g.:
     <img src="img/img.png" class="img-fluid d-none d-sm-block" />

 - img-thumbnail adds a border and padding to the image,
   making it look like a thumbnail, e.g.:
     <img src="img/img.png" class="img-thumbnail" />

 - You can use "float-start"/"float-end" to wrap text around images:
     <img src="img/img.png" class="img-fluid float-start" />
     <img src="img/img.png" class="img-fluid float-end" />

 - Use "figure" and "figcaption" to add captions to images:
     <figure class="figure">
       <img src="img/img.png"
        class="figure-img img-fluid rounded"
        alt="A generic square placeholder image with
             rounded corners in a figure.">
       <figcaption class="figure-caption">
          A caption for the above image.
       </figcaption>
     </figure>


=========================================/
BOOTSTRAP NAVIGATION BARS ==============/
=======================================/
 1- Start with an unordered list, but add class="nav" to the <ul>
   where the "nav-tabs" added after "nav" gives the "type" of nav-bar,
   then each list-item needs a <li class="nav-item" attribute:

    <h3>Community Partners</h3>
    <ul class="nav nav-tabs" role="tablist">
        <li class="nav-item">Bootstrap Outfitters</li>
        <li class="nav-item">Git Out Expeditions</li>
        <li class="nav-item">Mongo Fly Shop</li>
    </ul>

 - What does role="tablist" mean?  And what is role="tab" below?
 - Similarly, role="tabpanel" is shown below.

 2- To make a nav-tab item link to something, inside the <li> tab
   you need <a href="" role="tab" data-bs-toggle="tab"> as shown:
     	<li class="nav-item">
     	  <a class="nav-link" href="#git" role="tab" data-bs-toggle="tab">
 		Git Out Expeditions</a>
	</li>

 3- Under your <ul> rendering, you need to present the tabbed
    content with: <div class="tab-content"> then for each subject,
    use <div role="tabpanel" class="tab-pane fade"> for each tab, and for
    the active:  class="tab-pane fade show active" as shown:

    <div class="tab-content">
        <div role="tabpanel" class="tab-pane fade show active" id="bootstrap">
            <h4>Bootstrap Outfitters <small>Outdoor Gear Specialists</small></h4>
            <p class="d-none d-sm-block">Bootstrap Outfitters supplies you
		 with the gear you need at prices you can't beat.</p>
        </div>

  4- You class="tab-content" should be customized in your local css file
     to add borders, etc. like so:
	.tab-content {
    	  border: 1px solid #DDD;  border-top: none;  padding: 10px;
	}

  5- Note that panels do not work unless you use the bundle JS file like so:
    <script src="css/bootstrap.bundle.min.js" crossorigin="anonymous"></script>


=====================================/
BOOTSTRAP CARDS ====================/
===================================/
 - Cards use the bootstrap class="card", example:
  <div class="card" style="width: 18rem;">
    <img class="card-img-top" src="..." alt="Card image cap">
    <div class="card-body">
      <h5 class="card-title">Card title</h5>
      <p class="card-text">Some quick example text to build on the card
         title and make up the bulk of the card's content.</p>
       <a href="#" class="btn btn-primary">Go somewhere</a>
    </div>
  </div>

 - https://getbootstrap.com/docs/4.0/components/card/


==~===~===~==~===~===~===~==~==~===~===~==~==~==~===~==~==~=/
==~==~===~ BOOTSTRAP RESOURCES =~==~==~==~==~==~===~==~==~=/
==~===~===~==~==~==~===~==~==~===~===~==~==~==~===~==~==~=/
Bootstrap 5.2 Official Documentation - Getting Started
  - https://getbootstrap.com/docs/5.2/getting-started/introduction/
W3Schools' Bootstrap Guide - https://www.w3schools.com/bootstrap5/
Start-Bootstrap - Bootstrap Resources
  - https://startbootstrap.com/bootstrap-resources/
Most Popular Front-end Frameworks Compared
  - https://www.sitepoint.com/most-popular-frontend-frameworks-compared/
Building Twitter Bootstrap - An early article on the origins of Bootstrap by one of its creators
  - https://alistapart.com/article/building-twitter-bootstrap/

Bootstrap Flex Utility	- https://getbootstrap.com/docs/5.2/utilities/flex/
Bootstrap Grid          - https://getbootstrap.com/docs/5.2/layout/grid/
Bootstrap Tables	- https://getbootstrap.com/docs/5.2/content/tables/
Bootstrap Cards  	- https://getbootstrap.com/docs/5.2/components/card/
Bootstrap Forms         - https://getbootstrap.com/docs/5.2/forms/overview/
Bootstrap Form Controls - https://getbootstrap.com/docs/5.2/forms/form-control/

Bootstrap Collapse	- https://getbootstrap.com/docs/5.2/components/collapse/
Bootstrap Accordion Ex	- https://getbootstrap.com/docs/5.2/components/accordion/
Bootstrap Tab/Menus 	- https://getbootstrap.com/docs/5.2/components/navs/#tabs
Bootstrap Carousel 	- https://getbootstrap.com/docs/5.2/components/carousel/
Bootstrap Images	- https://getbootstrap.com/docs/5.2/content/images/

W3Schools - using flexboxes -> https://www.w3schools.com/css/css3_flexbox.asp
W3Schools - CSS Flexbox	- https://www.w3schools.com/css/css3_flexbox.asp
Wikipedia - Lorem Ipsum - https://en.wikipedia.org/wiki/Lorem_ipsum

Codepen.io is a good playground for playing with new code.
- userID: is patrickesty@hotmail.com?
- has pre-defined frameworks to auto-add-in to your browser
  such as bootstrap, foundation, animate.css, bulma, materialize


============================/
FONT-AWESOME RESOURCES ----/
==========================/
Font Awesome 6 official docs -> https://fontawesome.com/docs
Font Awesome Free Icons -> https://fontawesome.com/search?m=free&o=r
Sitepoint: Introduction to Icon Fonts
 -> https://www.sitepoint.com/introduction-icon-fonts-font-awesome-icomoon/
KeyCDN.com: Icon Fonts vs SVGs
 -> https://www.keycdn.com/blog/icon-fonts-vs-svgs


CSS CODING GAMES:
=================
Flexbox Froggy- A game where you help Froggy
             and friends by writing CSS code!
 -> https://flexboxfroggy.com/
CSS Grid Garden - A game where you write CSS
             code to grow your carrot garden!
 -> https://cssgridgarden.com/
Exercism- Games available in 74 different languages
 -> https://exercism.org/

Python Development Tips & Tricks
- Quick Links: Math/Operators -- Code-Conditionals -- Functions() -- Random-Numbers -- Data-Types (Advanced) -- String-Formatting
- Algorhithms: Bubble Sort
- Modules/Packages -- Classes and OOP's -- Linked-Lists --
- Python Certifications
******** BASICS *********
* Code has no semi-colons & no curly braces {}
  for logic -- only for JSON/dictionary vars.
* EQUALITY/Comparison operators match Java/C
  for == >= <= > < and != (but not <>)
# This is a comment (can be in-line after code)
""" - for multi-line comments, surround the
      begin and ending with "triple-quotes"
"""
* VARIABLES are just: xxx = value (or "value")
  - Can only have letters, numbers, and "_".
  - Var-names must NOT start with a number.
  - Without an explicit declaration, variables
    are implicity assigned a data-type, examples
    shown below.
  - Use type() to determine type of variable:
       print(type(x))  #example:
# - If x=2.5, returns: <class 'float'>

Binary Types: 	bytes, bytearray, memoryview
=============================================
  x = b"Hello" (bytes)
  x = bytearray(5)
  x = memoryview(bytes(5))

Boolean Type: 	eg.  x = True (or False)
None Type:    	eg.  x = None
Text Type:     	str  - eg.  x = "Hello World"
 -Text can use single qts:  x = 'Hello World'
 -Text when combined w/bth  x = "Hello ya'll"

 Numeric Types:	int, float, complex
 (NOTE: letter j is imaginary "i" in Python)
============================================
  x = 20  (int)   x = 20.5 (float)   x = 1j
NOTE: This subject below is expanded upon in theAdvanced Data-Types section (near bottom of this tab).
COMPOSITE DATA TYPES (3 MAIN TYPES:)====================================The word immutable
means cannot be changed.
  Mapping Type: 	dict - (using {} curlies)
    x = {"name":"John", "age":36}

  Sequence Types:	[list], (tuple), range
    x = ["a", "b", "c"] (list, changeable)
    x = ("x", "y", "z") (tuple, immutable)
    x = range(6)

  [Fixed] Set Types: set, frozenset
    x = {"a", "b", "c"}  (using {} curlies)
    x = frozenset({"x", "y", "z"})

  NOTE: All set types are immutable and can NOT
      contain duplicates, so think enum's
MATH OPERATIONS:=================================================
  Standard: + - * /  - add, minus, multiply, divide
  Floor Division: // - removes decimal, no rounding
  Remainder: % - e.g. 5 % 3 = 2  Exp: ** - 3**2 = 9
  NOTE: Division will always return a float value,
        even if no remainder, e.g. 4 / 2 = 2.0
        except w/Floor Division: 4 / 2 = 2

OPERATOR PRECEDENCE RULES:
==========================
Runs as expected as other languages:
  1. parenthsized expressions (or bindings)
  2. await expression, e.g. await X
  3. ** exponent takes highest precendence
  4. bitwise +x -x ~x (bitwise NOT)
  5. multiply/divide/modulus, including @
  6. add/subtract (left to right)
  7. shifts << and >> for bits
  8. bitwise AND (&), bitwise XOR (^), bitwise OR (|)
  9. boolean NOT (not x), boolean AND, boolean OR
  10. conditional if/else, then lambda
  11. assignment expression :=
PYTHON CONDITION/DECISION CODE STRUCTURES:================================================= - It's all controlled by indentation w/colon (:)
if x < y:
print("Hello There")
print("X is < Y")
if x >= y:
print("X is >= Y")
- Chaining/Nesting Conditions w/if, elif, else:
if x <= 2:
print("small")
if x == 1: # nested! (hard to read)
print("smallest")
else:
print("must be zero")
elif x < 10:
print("medium")
else:
print("large")
#WHILE loops are also controlled by spacing:
#This OUTPUTS: 1 2 4 5 I'm done!
i = 1
while i <= 9:
print(i)
i += 1
if i == 3: #skip ALL next lines
continue
if i == 5: #exit loop early
break
print("I'm done!")
#input() can be used to wait for user response:
name = input("What is your name? ")
print("Hello " + name + "!")
#FOR "xyz" STRINGS & FOR X IN RANGE (a, z, step):
==================================================
# - this is a "foreach" case used to parse bytes:
for x in "string"": print(x)
# - returns: s t r i n g (a byte per line)
#FOR X IN RANGE (start, stop, step) EXAMPLE:
# - 0=start, stops at 5, step=1
for i in range(0, 5, 1): print(i) #can be negative
# /\ Will output per line: 0 1 2 3 4# Important: when it reaches "5", that is a condition# to STOP but BEFORE executing print(i).-
If you used
for x in range(2,6): print(x)
it will assume "step=1", 2 is the starting number, and 6 as the ending condition, and so will output:2 3 4 5
And if you usedfor x in (3): print (x)
it will asssume 0=start and outputs:0 1 2
- When using FOR loops, they follow the same indentation rules as WHILE, and also support BREAK and CONTINUE commands the same as WHILE. It also supports an ELSE: statement if placed immediately after the FOR main section (treated as a "finally" section).
- You can also loop a for through an iteration
using a dictionary, e.g.
fruits = ["apple", "banana", "cherry"]
for x in fruits: print(x)
- Lastly, you can nest a for loop inside another for loop.
PYTHON BUILT-IN FUNCTIONS:==========================- Full list found here
  print("abs(-1)=", abs(-1))       #  1
  print("float(100)=", float(100)) #  100.0
  print("int(1.23)=",  int(1.23))  #  1
  print("int('5')=",   int("5"))   #  5
  print("int('5.5')=", int("5.5")) #  RETURNS ERROR!
  print("int(float('5.5'))=", ...) #  5 (use float!)
  print("pow(2, 3)=", pow(2, 3))   #  8
  print("round(5.6)=", round(5.6)) #  6

  print("max(1,-5,10)=", max(1,-5,10)) # 10
  print("min(1,-5,10)=", min(1,-5,10)) # -5
PYTHON USER/CUSTOM FUNCTIONS:============================
  def add(x, y):
    z = x + y
    return z
  # anything after "return" line gets ignored

  x = add(2, 3); print("add(2, 3)=", x) # returns: 5

  #NOTES: If your function doesn't return a value,
  #       it is called a "void" function.  If you
  #       try to assign a void function to a variable
  #       it will be assigned a None value by default.
  # - A variable defined inside a def/function is a
  #   "local scope" aka "function scope", and do NOT
  #   override global variables of the same name.
  # - If you intend to re-assign a value to a globally
  #   scoped variable, you must use the word "global":

  my_string = "Set in global scope"
  def do_something()
    global my_string  # allows changing a global var
    my_string = "Set in local scope"

  do_something()
  print(my_string)    # returns: Set in local scope

  # So, if "global my_string" was not there, the global
  # value would have reverted back to "Set in global scope"
  # after calling do_something()
- Click here
on Lambda functions: an intermediate concept
of shortening code that looks like:
aCubed = lambda a: a ** a ** a
print("aCubed(2)=", aCubed(2))
# returns: 16, as aCubed(2)= 2**2=4 & 4**2 = 16
- For a word "Tom", a text-array is zero-based,
so if myText = "Tom", you can parse it as:
myText[0]=T, myText[1]=o, & myText[2]=m
which is why in this code below you start with Len-1
and end on -1 which is one less than 0, e.g.
for x in range(iLen -1, -1, -1):
 # ANOTHER EXAMPLE:
  def reverse( myText ):
    iLen = len( myText )
    sRet = ""  #this var is reversed
    for x in range(iLen -1, -1, -1):
      sChar = myText[x]
      sRet = sRet + sChar
    return  sRet
  #end def reverse()

  name = input("What is your name? ")
  print("Your name reversed:", reverse(name))
NOTE: This is a string shortcut of the above!! def reverse(str): return str[::-1]Random Numbers
- All you have to do is "import random" (which is built into the default python install) and address the dozen of functions using random.randit(x, y) - for "random integer":
   # Return a number between 3 and 9 (both included):
   import random
   print(random.randint(3, 9))

   #ALSO (alias to this function):
   print(random.randrange(3, 9))

   #Also see w3schools for things like:
   # x=random.random() #float number between 0-1
- You can also randomize sequence data types
such as lists or tuples using "choice", example:
import random
pets = ["dog", "parakeet", "cat"]
print random.choice(pets)
random.shuffle(pets)-- takes the dist array and actually re-arranges the internal order of the values in the array.
Python Advanced Data-Type Concepts
- This section is an exansion of Python Variable Basics (at the top of the tab)
COMPOSITE DATA TYPES (3 MAIN TYPES): ADVANCED=============================================The word immutable
means cannot be changed.
  Mapping Type: 	dict - (using {} curlies)
    x = {"name":"John", "age":36}

  #Iterating through dict's use "for x in nnn":
  =============================================
  state_capitals = {"Washington": "Olympia",
                    "Oregon": "Salem",
                    "California": "Sacramento"}
  #print(len(state_capitals))  #returns 3 /\
  state_capitals["Texas"] = "Austin"
  #print(state_capitals["Washington"]) #Olympia

  for state in state_capitals:
   print(state_capitals[state],"capital=",state)
  print ("\n#Alternatively:")
  for state, city in state_capitals.items():
    print(city, "is the capital of", state)


  Sequence Types:	[list], (tuple), range
  =================================================
    x = ["a", "b", "c"] (list, changeable)
   (see section after this on list iterations)

    x = ("x", "y", "z") (tuple, immutable)

    x = range(6)


  What can and can't you do with tuples?
  =============================================
  1) x =  "x", "y", "z"  #parenthesis optional!
  2) You cannot change x[1]="j", etc. BUT...
  3) You can change ALL as: x=("m","n","o")
     as you are just re-assigning the variable
  4) You access values like a dict/array but
     is faster in speed as it's not "dynamic"
     e.g.  myValue1 = x[0]  myValue2 = x[1]
  5) Does not suport .pop() nor .append()


  [Fixed] Set Types: set, frozenset
  =============================================
    x = {"a", "b", "c"}  (using {} curlies)
    x = frozenset({"x", "y", "z"})

  NOTE: All set "data-types" are immutable and
      can NOT contain duplicates so think enum's
  ** The "data-type" of a set can not be changed
     (means an entry can't be a dict or list[])
     but the "contents" are mutable after it's
     creation.
      -> valid: my_set = {"a", 123, (True,False)}
         as the 3rd value is a tuple: immutable
      -> INVALID: my_set={"a", 123, [True,False]}
         as the 3rd value is a dictionary:mutable
  ** They are NOT indexed, so you CANNOT access
     via x[0] (bracket notation)
      -> If you run this: my_set = {"a",123,123}
         it will be created but equal: {"a",123}

  ** This does not create a blank set: x= {}
  ** So, you have to use this:  x= set()

  #REM: strings are immutable variables, so it works!
  words_set = {"Alpha", "Bravo", "Charlie"}

  abcd = ""
  for word in words_set:
    abcd += word
  print(abcd)
  #sets are NOT ordered, so sometimes you get
  #AlphaBravoCharlie, sometimes BravoCharlieAlpha, etc.

  if "Alpha" in words_set:
    print("Alpha is in set")  # <- always true
  else:
    print("Alpha not in set")

  #As you recall, set VALUES are mutable:
  words_set.add("Delta")
  words_set.discard("Bravo")


  LIST TYPES are the most fun, which have these functions:
  ========================================================
  #NOTE: This is full set of list/array methods shown
  states = ["Washington", "Oregon", "California"]

  #This will take the last item and count from rear:
  print(states[-1] + ",", states[-2])  #ret Cal.., Oregon
  #print(states[-4])  #returns IndexError: ..out of range

  states[2] = "Arizona"
  print(states)  #ret ['Washington', 'Oregon', 'Arizona']

  states.append("New York")  #same as states.extend(...)
  print(states)  #['Wa..', 'Oregon', 'Ar..', 'New York']

  states.pop()  #removes 'New York' from the END
  states.pop(1) #removes 'Oregon' (via 0-based indexing)
  print(states) #returns ['Washington', 'Arizona']

  states.sort()
  print(states) #returns ['Arizona', 'Washington']

  states.insert(1, 'California') #inserts after Arizona
  states.reverse()
  print(states) #returns ['Wash..', 'Ca..', 'Arizona']

  states.remove('Arizona') #looks for, removes Arizona
  print(states) ##returns ['Washington', 'California']

  states.append("Idaho")
  states.append("Utah")
  #this \/ returns 2 (0=WA, 1=CA, 2=ID, 3=UT) + len
  print(states.index("Idaho"),"of",len(states)) #2 of 4
  #NOTE: states.count("Idaho") ret count of Idaho's
  # print(states.count("Idaho")) #returns 1

  #NOTE: This does an immediate True/False search
  if ("Washington" in states): print("I found WA")

  #SLICING: to take out parts of a list using colons,
  # also called "bracket notatation & indexes", where
  # start at "1" (via zero index) but UP TO 3:
  print("Best States: ", best_states[1:3]) #['Oregon', 'Ca..']
  # do not confused to "step 3": start at 1, but use step 3
  print("Odd States: ", best_states[1::3]) #['Oregon', 'Ohio']
  # you can put any number such as 9 /\ in the middle as "max"
  print("Odd States: ", best_states[1:9:3]) #['Oregon','Ohio']

  best_states.sort()   #start at 0, end \/ at 2 (not including):
  print("First 2 states: ", best_states[:2]) #['Ar.., 'Cal..']
  print("Last 2 states: ", best_states[-2:]) #['Or..', 'Wa..']
  print("Last 2 states: ", best_states[4:]) # Same thing w/6
Advanced String Functions/Formatting
- Use the f'blah blah' function to do inline formatting:
number = 5square = f"The square of {number} is {number ** 2}."print(square)# returns:The square of 5 is 25. - For decimals, three significant digits example:
pi = 3.14159formatted_pi = f"Pi = {pi:.3f}"print(formatted_pi)# returns:Pi = 3.142
With rounding of the last digit! - Inside of each {} you can also apply functions to
variables such as:print(f"My name is {name.upper()}!") - Other useful string functions:
- name.strip() # remove leading/ending white-space
- name.rstrip() or name.lstrip() # for either side
- name.replace("at", "et") # very useful replace
- name.split(',') # returns ['word1', 'word2', ...]
- name.capitalize()
- name.isalpha() # are all letters?
- name.isalnum() # are all alpha numeric?
- name.isdigit() or name.isdecimal() or name.isnumeric()
- name.ljust(nn) # pads to right (left-justify)
- name.rjust(nn) # pads to left for nn total len.
Python Algorhithms - the Bubble Sort
underlineTxt = "===================="
#FIRST, compare to a LINEAR SEARCH:
def linear_search(the_list, target):
  for x in range(len(the_list)):
    if the_list[x] == target:
      print("Found at index", x)
      return x
  print("Target is not in the list")
  return -1
#END def linear_search

unsorted_list = [101, 49, 3, 12, 56]
myNum = linear_search(unsorted_list, 12)

#SECOND, compare to a BINARY SEARCH (faster):

def binary_search(the_list, target):
  lower_bound = 0  #lists are zero-indexed!
  upper_bound = len(the_list) - 1

  while lower_bound <= upper_bound:
    #NOTE: "//" means modulus (remainder):
    pivot = (lower_bound + upper_bound) // 2
    pivot_value = the_list[pivot]

    if pivot_value == target:
      return pivot  #exit condition
    if pivot_value > target:
      upper_bound = pivot - 1
    else:
      lower_bound = pivot + 1
  #end while lower_bound <= upper_bound
  return -1
#END def binary_search


comment = "(binary_search must use a sorted list)"
print(f"\nTesting 10, 4, 33 -- {comment}")
test_list2 = [1, 2, 3, 4, 5, 6, 7, 8, 9, 10]
print("From List:", test_list2)
print(binary_search(test_list2, 10))


#NEXT, see it used in a BUBBLE SORT:
#===================================
def bubblesort(the_list):
  high_idx = len(the_list) - 1
  iIter = 0

  print(the_list, 'i', 'j')
  print(underlineTxt, '=', '=')
  for i in range(high_idx):
    list_changed = False
    for j in range(high_idx):
      item = the_list[j]
      next = the_list[j+1]

      if item > next:
        the_list[j] = next
        the_list[j+1] = item
        list_changed = True

      #output line:
      iIter += 1
      print(the_list, i, j, ' Iter:', iIter)
    #end for j

    #stop going to next i if no changes in prev:
    if list_changed == False:
      break
  #end for i
#end def bubblesort

bubblesort(unsorted_list)
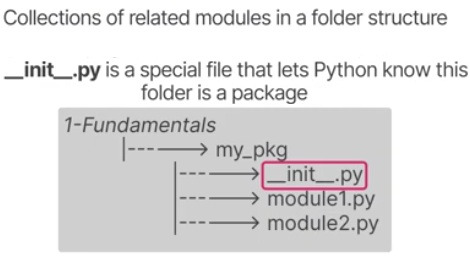
Python Packages and Modules
- Python Modules are "custom libraries"
as a collection of related modules, each of which are
set up in a self-contained folder, a library of which
is implied to the compiler when the following
file exists in that folder:
__init__.py(image below)
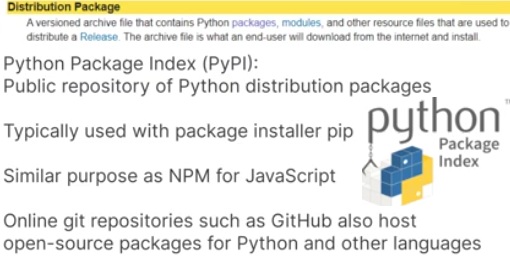
- Python Distribution Packages, on the other
hand, are pre-compiled libraries used to distribute a
release of open-source software. You can access them
through a public package depository called "PyPI" or the
"Python Package Index", packages of which
are also found in online repositories like GitHub.
- You can import a single-file module with the command:
import <filename>OR
from <filename> import fnX [, fnY, ...]
As an example, here is a sample 'filename' called my_module.py:
my_module.py =============== def greet(name): print("Hello", name + "!") flavor = "mint chip" File: main.py =============== import my_module # With this import, you must fully qualify the fn-name # or variable-name (flavor) like so: my_module.greet("Albert Einstein") print("My favorite ice cream flavor is", my_module.flavor) File: main_advanced.py ====================== from my_module import greet, flavor # With this import, you don't need to fully qualify: greet("Albert Einstein") print("My favorite ice cream flavor is", flavor) - In your "from my_module import" you can select
any number (or just one) of the functions from
the import, e.g.
from my_module import greet
Python Classes and OOP's
- A simple class:
  class User:
    def __init__(self, name, email, password):
      self.name = name
      self.email = email
      self.password = password

    def change_password(self, password):
      self.password = password
      print("Your password has been changed to", self.password)

  #instantiation example:
  user1 = User("Pat", "patrickesty@hotmail.com", "apassword")
  print(user1.password)
  user1.change_password("bestpassword")

  #returns: apassword
  #Your password has been changed to bestpassword

  #an example of class inheritance:
  class BankUser(User):
    def __init__(self, name, email, password):
      super().__init__(name, email, password)
      self.balance = 0

    #be careful of spacing to include a method of BankUser!
    def check_balance(self):
      print(self.name, "has an account balance of:", self.balance)
  #end class BankUser

  bankuser1 = BankUser("Pat", "pat@esty.cloud", "newassword")
  bankuser1.check_balance()  #Pat has an account balance of: 0

  #interesting: you don't create the User class explcitly,
  #as it creates one implcitly with parameters already defined
  #in the User class in the previous set of code above.
Python Linked Lists - Examples
#PART 1) ===== A LINKED LIST NODE =========
class Node:
  def __init__(self, value):
    self.value = value
    self.next = None

head = Node("1st Node")
head.next = Node("2nd Node")
head.next.next = Node("3rd Node")

print(head.value)   # prints "1st Node"
print(head.next.value)    #  "2nd Node"
print(head.next.next.value) #"3rd Node"
print("")

#PART 2) ======= TRANSVERSING =============
def iter_linked_list(node):
  while node is not None:
    print(node.value)
    node = node.next

#This auto-creates a new Node object
# and simultaneous assigns 3rd node.next:
head.next.next.next = Node("4th Node")

iter_linked_list(head)  #repeats same + 4th

#PART 3) ==== LINKED LISTS WITH CLASSES ===
class LinkedList:
  def __init__(self):
    self.head = None

  def append(self, value):
    new_node = Node(value)

    if self.head is None:
      self.head = new_node
      print("Head Node created:",
            self.head.value)
      return

    node = self.head
    while node.next is not None:
      node = node.next

    node.next = new_node
    print("Appended new Node with value:",
          node.next.value)
  #END def append(self, value)
#END class LinkedList

print("")
llist = LinkedList()
llist.append("First Node")
llist.append("Second Node")
llist.append("Third Node")

#Outputs:
# Head Node create: First Node
# Appended new Node with value: Second Node
# Appended new Node with value: Third Node

#PART 4) ===PUSH/POP STACKS w/LINKED LISTS===
class Stack:
  def __init__(self):
    self.head = None
    self.num_nodes = 0

  #pop means to put it on TOP (head):
  def push(self, value):
    new_node = Node(value)

    if self.head is not None:
      new_node.next = self.head

    self.head = new_node
    self.num_nodes += 1
  #end def push

  def pop(self):
    if self.head is None:
      return None

    pop_node = self.head.value
    self.head = self.head.next
    self.num_nodes -= 1
    return pop_node
  #end def pop

  def size(self):
    return len(self.items)

#end class Stack()

stack = Stack()
stack.push(1)
stack.push(2)
stack.push(3)
stack.push(4)

print("Pass" if (stack.size() == 5) else "Fail") # - Fail
print("Pass" if (stack.num_nodes == 5) else "Fail") #Fail
stack.push(5)  #retutrns "Fail"
print("Pass" if (stack.num_nodes == 5) else "Fail") #Pass
- Did you know there are certifications for Python devs?
- PCEP — Certified Entry-Level Python Programmer
See https://pythoninstitute.org/pcep - PCAP — Certified Associate in Python
See https://pythoninstitute.org/pcap
- PCEP — Certified Entry-Level Python Programmer
Subject 5 - TBD
- Future links are TBD, and not limited to the following: web-languages, video-gaming links, common tools used in HVAC industry.
Recent Stuff about HTML5
- HTML void elements are also called "self-closing" tags meaning no start/end tag, e.g. <meta charset="utf-8" />
- only a handful can use it: meta, img, <br />
- the closing slash is optional! (but parser warns)
- Elements can have "boolean attributes" that default to true so you dont need ="true" after, e.g. <p id="hi2" hidden>..
- All HTML docs are "valid" when they have a set of declarations:
<!DOCTYPE html> <html lang="en"> <head> <!-- tells the browser how to set your webpage --> <meta charset="utf-8" /> <!-- first element after head --> <title>...</title> </head> <body>...</body> </html> - The <section> element was introduced to enhance <div> as it is designed to contain a group of related material.
- <em> for emphasis, replaces old <i> deprecated tag </em>
- <strong> same as <b> (intended to be replaced but very common)
- <nav> and <footer> are re-specialized <section> tags in use
- <a href=".."> has new elements: href="tel:407-..." and you know about <a href="email:patrickesty@hotmail.com">
- <form> objects now have internal groupings called <fieldset> in which its title needs a <legend> section title </legend>.
- <input type="XX" name="YY" .. has new attributes called: placeholder="greyed out" required> where it shows a "suggestion" which is "greyed out" and disappears on typing.
- the "required" boolean will disallow a "submit"
of the form if no text supplied.
-> new types exist in HTML5, the first gives a "slider bar": <input type="range" name="myRating" min="1" max="10" /> <input type="color" name="myColor" /> <!-- pick-a-color! --> <input type="file" name="myFile" /> -> the type="file" requires your <form> to contain the attribute: enctype="multipart/form-data" to allow posting of file objects. -> use a <label for="txtName">My Name</label> to increase hit-area for a <input type="text" id="txtName" name="txtName" ... /> (where the "for" targets the id of the associated input object). - <video> Text in between this tag is the
fallback content displayed if the browser does
not support HTML5 embedded content, such as --
  <a href="gotovideo.mp4">Go to this video here</a></video>
   -> HTML5 video 3 major types:  mp4, ogg, or webm
   -> attributes of are (and must be prefixed with "controls"):
      <video src=".." controls width="200" height="300" loop>...</video>
       - loop (boolean, default true) - replays video when finished
       - autoplay (boolean) - auto-starts the video on page-loaded
          -> some browsers suppress even if enabled; it's annoying
Contact Me
Orlando, FL 32812USA