Heating, Ventilation, and Air Conditioning Notes
This page is reserved for HVAC notes, tips, and tricks that I have found useful in my HVAC and MVAC (Motor Vehicle Air Conditioning) journey. It focuses on the more complex aspects of HVAC work, such as vacuum and leak testing, plus EPA exam key notes.
Tab summary of content:

- Certification - will go over key notes for the EPA 609 MVAC and EPA 608 HVACR certification exams -- and some suggestions for HVAC Excellence.
- Charging - works through several subjects of both evacuation/dehydration & re-charging of HVAC systems in order to repair or replace systems.
- Electrical - focuses on electric work and critical system components of an HVAC system.
- Refrigerants - lists common refrigerants so you know their classifications, oil compatibility, and EPA restrictions (and phase-out schedules).
- Troubleshooting - goes of the most common and/or difficult challenges of HVAC & MVAC service-repairs.
HVAC Basics:
Everything that is learned that is complex is built
on some solid basics. They include these important ones,
(but is not limited to), the following:
- Understanding Temperature Scales - know Fahrenheit vs Celcius, Kelvin, and Rankine's
- Understanding Gas/Pressure Laws
- Understanding Thermodynamics

EPA 608, MVAC 609 and Other Certifications
- The EPA 608 HVACR exam covers topics such as
refrigerant handling, system maintenance, and
environmental regulations. To become certified,
you must pass the "core exam" and one of three
Type I/II/III exams, or if you complete all three
exams, you will be eligible for the "universal"
certification. Due to how large this subject is,
I posted my detailed notes on
EPA 608 exam material -> here.
While EPA certification does not guarantee that you are a trained professional, it will help you work within the legal confines of Federal law and understand your impact to the environment.
- The EPA 609 MVAC exam is an open book exam that
focuses on mobile vehicle A/C systems and most of
the EPA 608 Core exam (discussed above).
Most vehicles run on medium-pressure R134a
and R1234yf refrigerants, so the focus is on
safety precautions, handling/disposal of refrigerants,
and leak detection methods. It will uniquely cover
SAE (Society of Automotive Engineers) standards
regarding the above, such as SAE J639.
To get started in MVAC certification, I would recommend downloading free training material, which includes practice exams, and even the online test itself at the ESCO group: https://www.escogroup.org/training/epa609.aspx
- The ESCO institute also sponsors training and certification
in the HVAC Excellence credential (to prove
your knowledge in the subject), and an entire suite of training
opportunities, found at: https://hvacr.elearn.network/
System Evac/Dehydration and Charging Topics
- For some reason, this is one of the more challenging, often
misunerstood and even dangerous subjects. Do not attempt to
do recharging work without experience or technical help as
a) it is illegal to do refrigerant handling work if you are not EPA
certified (you could face fines upwards from $25,000 to $45,000
per incident, per day),
b) it is dangerous because you are managing flammable
refrigerants that can freeze/burn your skin instantly on contact, and
c) do something wrong and you can permanentaly damage your
system, your tool(s), and even yourself. So, beware and take
great care!
- First and foremost, let's get past the rumor of this saying:
"All I need to do to get my air conditioner to work is 'top off'
my system with refrigerant." Well, for one, ask
youself, "Why is it low on refrigerant?" (if low refrigerant is the
actual challenge to your system, that is). It has a leak.
Even as refrigerant tends to produce a pressure that pushes from
the inside to the outside, when you turn off the system, the
pressures "equalize", and that is where leaks can start to pull in
contaminants like water vapor, nitrogen, etc. In other words,
if you just "top off your system", your system will still be
contaminated. A contaminated system throws off your system design
by reducing its cooling effect, and such things as water reacting
with refrigerant causes acids and sludge to form with the oil.
-
So, with that said, how do you detect if you system is contaminated
or not? Luckily, we have established "PT charts" or pressre-temperature
relationship charts. Your refrigerant, if pure, will present an
exact pressure at a known given temperature. So, the steps are
as follows for this check:
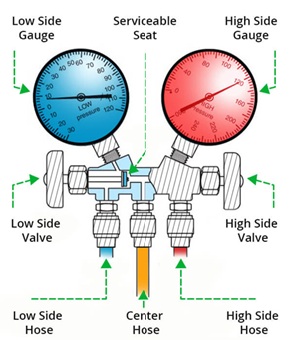
It is VERY IMPORTANT that you understand how
          manifold-gauges work (which I'll refer to in the rest
          of this document as your "guages").  So, study this diagram
          very carefully
: notice how the two SIDE valves should be closed to the center "yellow" for readings (used for charging refrigerant or evacuating a system), and that both the red/blue lines still connect directly to the dial/guages when the side-valves are CLOSED (CLOSED meaning the valves are turned clockwise completely).Remember the mnemonic, "righty tighty, lefty loosie".- With a refrigerant manifold-guage, connect to one HVAC port with the system/compressor OFF and take the port's pressure reading (and don't forget protective gear such as eye-protection and iso-butyl gloves). You don't necessarily need your system running (except to see how your compressor is actually "performing" on the high-side) just to check system pressures and the state of refrigerant in your system.
- You also have to take the temperature of the line with a reliable temperature sensor on the same line you have connected with your HVAC refrigerant guage. The temperature of the "line" may be different from "ambient air temps", but if you are without a line-temp thermometer, make sure your system is at rest for some time and the line comes to room temperature after a few hours if you use a regular room-temp thermometer. You need to take the temperature at a point closest to the entry of the guage to your A/C system when you that this measurement.
- Check the PT-chart and compare the known temp-pressure to the actual temp-pressure value, and if you are within 5%, your system is good to go. If the pressure is TOO HIGH in comparison to the PT-chart value for that refrigerant, chances are you have air in your system (as Nitrogen has a very high pressure compared to any refrigerant, and the Earth's atmosphere is 78% Nitrogen with the rest as Oxygen and water vapor).
- If you system does not follow the refrigerant PT-chart,
you will have to take your system to a licensed HVAC tech
in order to purge and refill the system (after a potential
leak repair, of course) to get it to operating specifications.
- In general, repairing of a contaminated system involves
recovering the existing refrigerant, recycling it with an EPA
approved appliance, removing impurities left behind (water vapor)
in a process called dehdryation or evacuation,
doing the repair, testing the repair when done with a leak test,
then refilling the system with non-contaminated refrigerant to a
"critical charge" (one that follows system specifications). So,
detailed below, here is what I typically do to repair a system:
- Get a recovery cylinder, evacuate & dehydrate it as you are not allowed to mix refrigerants unless they are the same exact refrigerant (and must follow safety precautions to not fill tanks past 80% capacity per EPA regulations).
- Recover refrigerant with an EPA-approved recovery device into an EPA-approved recovery cylnder. If you do not have recovery devices, you need to take your system to a shop (if we are talking a motor vehicle) to do the refrigerant recovery for you (or otherwise face EPA fines of up to $25k to $45,000 or more!). For a home air conditioner, you have to hire an HVAC tech with mobile equipment.
- After you recovered your refrigerant, your system is still
contaminated, so you have to do a dehydration
process by vacuuming your lines
PAST 29.6 inches of Hg
          (below 500 microns, to be more exact)
: not a simple feat. You have to understand that this is done by lowering the pressure of your system to where water vapor is set to BOIL at a lower temperature under a vacuum pressure. For example, at atmostpheric pressure at sea level, water boils at 212*F, but if you put a system under a vacuum, the boiling temp of water lowers to as much as 60-70*F. Read more about this in detail at the bottom of this page where it says, "understanding a vacuum pressure gauge". - Once you are satisfied with your evacuation, disconnecting hoses and tanks, you are ready for a repair. It is really beyond the scope of this page to discuss repair techniques due to the hundreds of potential system configurations.
-
 When you are done with your repair, you have to check your
system to see if it holds pressure and no leaks are present.
I do this with a
When you are done with your repair, you have to check your
system to see if it holds pressure and no leaks are present.
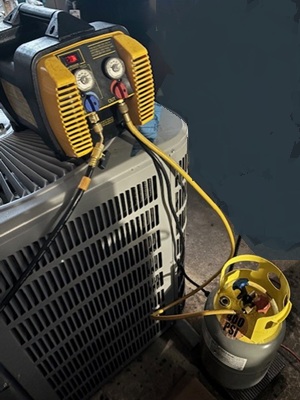
I do this with a Nitrogen tank w/pressure regulator. This process also needs a lot of safety precautions, which I will enumerate since they are so important:
- First, the Nitrogen tank must have a pressure regulator installed and working (image, right). Connect it to your guages under the "evacuation port" (or on some the the yellow hose, or "recharging port"). You also should only use "food grade Nitrogen" gas tanks (not liquid!).
- Second, you MUST read your system specifications to see the limits of your evaporator as they are designed to only withstand so much pressure (esp. with micro-channel tech). For example, with any MVAC system, I'm careful to only bring the Nitrogen pressure up to 50 psig. If you introduce any more pressure, you run the risk of doing irrepairable damage to your system.
- Third, learn how to hook up your gauages, and IMPORTANT:
DO NOT TURN ON YOUR HVAC SYSTEM IF IT'S
                          WITHOUT REFRIGERANT
. Your air conditioner compressor is only designed to work under a system filled with REFRIGERANT, so unforeseen consequences occur should you start a compressor filled with Nitrogen or worse yet under a vacuum. - Once you manage to push 50 psig of pressure into your HVAC system, you have to first LISTEN for any leaking; second WATCH the guage after you close it off (close off the hose-inlet and turn off the Nitrogen tank), then third, do a "bubble test" (next paragraph). If the guage does go down after some time, you have a leak, but then you have to find out where it is (the most challenging part sometimes in air conditioner repair!)
- Nitrogen tank safety: when done with your Nitrogen tank, purge the lines and close off the valve to avoid too much pressure on your lines for too much time.
- If your Nitrogen positive pressure holds after a few minutes, proceed with a leak test using a special "bubble/leak tester solution" which is a specially formulated glycerin mixture (I use this: HVAC Better Bubble). This, for me, has helped me more than you could imagine as leaks can be deceptive, even with advanced electronic leak detectors which can locate the "approximate area of a leak" instead. Just to be clear, some people portend that normal dish soap and water solution can do the same thing, but I find they only work in a limited fashion and do not really detect the smaller leaks.
- After you a satisfied with your repair leak-test,
you're not done! Next, evacuate your system by
removing the Nitrogen, attaching a vacuum pump to
your hoses, and doing a re vacuum of your system
again to below 500 microns.
IMPORTANT: after
           vacuuming your system, let it hold for a few minutes,
           watch to see if it rises in pressure (which may indicate
           there is still Nitrogen or water vapor in your system),
           then repeat a vacuum process THREE times.
This is called a "triple vac procedure". - This is the most important part of this process
of it all: Sometimes, even if you have a good
positive pressure test with Nitrogen, an vacuum test
may tell another story! I've had perfect Nitrogen
pressure tests but when followed by a vacuum test,
the latter part fails. A vacuum test is simply:
- Vacuum your system past 500 microns: it is IMPOSSIBLE to "OVER-vacuum" your system
- Note that this may entail an hour or two of waiting for a vacuum process to finish.
- Close all your valves on your guage set, turn off your vacuum pump (in that order), and wait for at least two hours (if not overnight) to see if the vacuum holds: take a picture of your guage set of BEFORE this wait-period, then compare to it after several hours. If it stays the same, you are golden. If not, find your leak and repeat the process all over again.
- After you vacuum-test process is successful (yay!)
NOW you are ready to charge your system. Now do you
understand how I support the first two paragraphs
written on this page above? Let's go over some
important and critical steps in this process:
- First, disconnect your vacuum hoses, etc, but
KEEPING the vacuum intact in your HVAC system, then
connect to your refrigerant source with all hoses
CLOSED. Important:
DO NOT TURN ON YOUR AIR
                    CONDITIONER YET AS IT IS UNDER A VACUUM
. - After your tanks are connected (and ports closed), the vacuum in your HVAC system must be maintained for two reasons: 1) to keep impurities like normal air and water vapor out, and 2) to provide a vacuum needed to "prep the first few ounces of refigerant" in order to prime the pressure of your system. Why? Remember when I said, "you can not start a compressor when the system is under a vacuum." If you do so, the compressor will cause electrical arcs and burn out before you even get started (even for a few seconds!) Even BEFORE you start to open ports, you must follow the NEXT STEP FIRST: to purge your lines of air.
- When you first connect guages to a refrigerant tank,
there are still impurities in your HOSES and your gauge.
So, you have to purge them first. So, to do that you
have to:
- Have low pressure line connected and closed; have high pressure line connected and closed; have yellow refrigerant line connected and closed.
- Open your refrigerant line first at the source of the refrigerant container. Then, at the point where your yellow hose connects to the guage, open it up slightly (and do NOT lose grip), and use the positive pressure of the refrigerant to purge the yellow line.
- Now you are ready to open the guage at the high and low side (WITH HVAC COMPRESSOR OFF), then purge each red and blue line just like you did the yellow line. After this, all of your lines should have nothing left but refrigerant.
- WITHOUT TURNING ON THE COMPRESSOR, you can
open up the high-side port AND the low-side port
into the HVAC system: the refrigerant will
naturally flow from the higher pressure refrigerant
lines to the very low vacuumed pressure and fill
in the space. When the transfer of refrigerant
slows down, this is the next
VERY
             IMPORTANT STEP: CLOSE YOUR HIGH PRESSURE SIDE
             OF YOUR GAUGE [ONLY] BEFORE CONTINUING REFILL
             PROCESS.
If you turn on your compressor and the high-side guage is still open, you run the risk of over-pressurizing and BLOWING UP your refrigerant canister with back pressure!!! - With enough said, you really need to understand your pressure gauges and how they work and connect together. This is for your safety.
- With enough refrigerant in your system, you are now safe to continue recharging your A/C system to a specific number of ounces (or pounds) in what's called a "critical charge": you need to put in an exact amount of refrigerant plus or minus an ounce or two for your HVAC system to work properly (otherwise there are more unforeseen consequences if it runs out of its specifications).
- When done charging, close off all guages starting with the high-side. To remove excess refrigerant from your high-side hoses after a disconnect, open your high-side guage on your manifold (BUT ONLY AFTER DISCONNECTING FROM THE A/C SYSTEM) to let refrigerant flow to the low side while the compressor is running. Before sure to close all manifold port guages before disconnecting the low-side ports and connectors (to prevent any contamination into your newly repaired system) and don't forget to close off your refrigerant source as well, of course.
- First, disconnect your vacuum hoses, etc, but
KEEPING the vacuum intact in your HVAC system, then
connect to your refrigerant source with all hoses
CLOSED. Important:
HVAC Electrical Topics
- As they say, electrical challenges can be 40-50% of service-calls, and in the humid & rust-belt areas, as much as 60-70% of calls, making this a "hot topic". Beware that some states require a certified Electrical Technician to do work on your system even if it's an HVAC system; however, an HVAC can help in the diagnosis before calling in the extra help.
Refrigerants & Oils in HVAC Systems
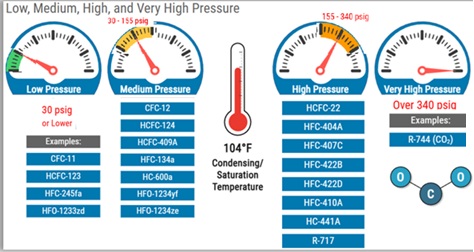
Refrigerants are classified by their operating pressure-range,
with diagram shown below, their safety classification, and of
course their chemical classification(s).
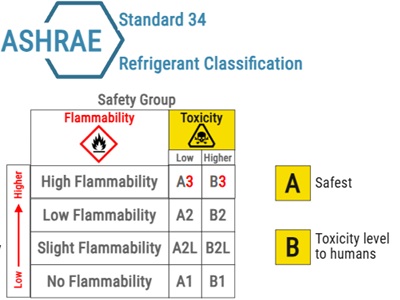
Here is a ASHRAE Standard 34 list of refrigerant classifications based on toxicity and flammability.
| Flammability | Less Toxic (A's) | Highly Toxic (B's) |
|---|---|---|
| High Flammability
(Hydrocarbons, e.g. HC-290) |
A3 - R50 methane, R290 propane, R600 butane | B3 - Rarely used in modern applications, e.g. R-1140 (vinyl chloride) |
| Med/Low Flammability | A2 - R-152a, R-142b | B2 - R-30 (Dichloromethane) |
| Mild Flammability | A2L - R-32, R-1234yf, R-454A, R-454B, R-452B, R-1234ze(E) | B2L - R-717 (Ammonia) |
| No Flammability | A1 - R-134a, R-410A, R-404A, R-22, R-507, R-407C, R-508A | B1 - R-123, R-124, R-245fa |
Refrigerants, Compatible Oils, and EPA Phase-Out Schedule
| Refrigerant | Type | Oil Used | Phase-Out/Status |
|---|---|---|---|
| R-11/R-12 | CFC | Mineral Oil (MO) | Banned (2020) |
| R-22/R142b | HCFC | Mineral Oil (MO) /Alkylbenzene |
Banned (2020) |
| R-123 | HCFC | Mineral Oil (MO) | Phasing out thru 2030 |
| R-404A/ R-507A |
HFC | Polyolester (POE) | High GWP - Phase down 2022-2024 |
| R-134a | HFC | Polyolester (POE) | High GWP - Phase down 2022-2024 |
| R-410A | HFC | Polyolester (POE) | High GWP - Banned in new systems 2025 |
| R-32 | HFC | Polyolester (POE) | Replacement (Low GWP) |
| R-454B | HFC | Polyolester (POE) | Replacement (Low GWP) |
Key EPA Phase-Out/Down Schedule
- January 1, 2020: Complete prohibition on production and import of R-22 and R-142b.
- January 1, 2022: 10% reduction in HFC production and consumption.
- January 1, 2024: 40% reduction in HFC production and consumption.
- January 1, 2025: Restrictions on using high-GWP HFCs (like R-410A) in new residential/commercial HVAC systems.
Troubleshooting HVAC Systems - Common Subjects
- Content is TBD, but will be related to HVAC topics such as vacuum and leak testing, EPA exam key notes, etc.
- Understanding a vacuum pressure gauge (aka
"compound gauge")--it measures both positive & negative pressures:
see referenced web-sites listed below for general knowledge, as EPA exams
reference BOTH inches of mercury (Hg") as well as microns (greek letter
"mu" or "μ"), but articles I had found discuss millibars only; however,
I found that 1 millibar (atmospheric) or 1 mbar(a)=750.06μ.
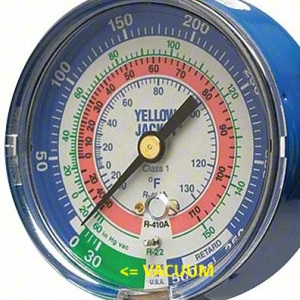
Did you know "microns" is short for a "thousandth of a millimeter", specifically "microns of Hg" to replace inches -- and that "vacuum" is never expressed as a negative number? Vacuum implies negative pressure as shown on the image, right: see the "green" area where Hg" is from zero (atmospheric pressure) to ~30Hg (total vacuum). Important: everytime you see a tilda (~) in front of a number, it means "approximately". In fact, you cannot go past 29.92 Hg" (which is total absense of pressure) and once past the 28" mark, it becomes really "impractical" with a compound gauge. From 28" Hg, you must actually use a special device called a "micrometer" to get the total actual number of required vacuum via. EPA requirements! To demonstrate, I placed this table below with further explanation. Oh, lastly, "Torr" was devised by a guy named Torricelli, which created the shorthand for mmHg (millimeters of mercury). So, instead of saying "millimeters of mercury", you can just say "Torr" and it's the same thing.
Sources: https://fluidpowerjournal.com/vacuum-measurement-a-basic-guide/
and https://www.kodytools.com/units/pressure/from/millibar/to/micronhg
Atmospheric pressure at top & "total vacuum"=29.92 Hg" at bottom
Hg"kPa
(%)microns
(μ)Torr
(mmHg)mbar
(a)Water
Boils0" ~0~ 760k 760 1014 212*F + 3" -10 675k 684 900 207*F + 6" -20 600k 608 800 200*F + 9" -30 525k 532 700 194*F + 12" -40 450k 456 600 187*F + 15" -50 380k 380 500 178*F + 18" -60 300k 300 400 168*F + 21" -70 225k 225 300 156*F + 24" -80 150k 150 200 141*F + 27" -90 75k 75 100 114*F + 28" -93 51k 51 ~68 100*F + 29" -97 21k 21 ~28 73*F 29.3 -98 11k 11 ~15 56*F 29.6 -99 4500μ 5 ~6 33*F 29.92 -100
kPa (%)0 μ 0 Torr
(mmHg)0 mbar
(a)<-2*F
- Why I need to know microns vs. other units:
EPA 609 MVAC certification requires a vacuum of 500 microns or less
when repairing systems and refilling them after a leak repair, and
EPA 608 HVACR certification requires a vacuum of 200 microns or less,
(dependent on the type of system & type of refrigerant used).
Details are found in this table:HVAC Type Vacuum Requirement Notes MVAC/HVAC Default <= 500 microns
or > 29.8" HgDone right before a recharge after repair. Note that numbers below are needed for 'leak testing procedures', while the 500 micron standard refers to what you need to do to 'dehydrate' a system after a major repair. Very hi-pressure appliance 0" Hg or more (atmospheric pressure) e.g. Nitrogen systems Hi-pressure
< 200lb0" Hg or more (atmospheric pressure) Domestic Type II Appliances Hi-pressure
>= 200lb10" Hg+ or
< 500k micronsLarge Type II Appliances Med-pressure
< 200lb0" Hg or more (atmospheric pressure) Domestic Type II Appliances; does NOT apply to Class I small appliances. Med-pressure
>= 200lb15" Hg+ or
< 380k micronsLarge Type II Appliances
Contact Me
Orlando, FL 32812USA